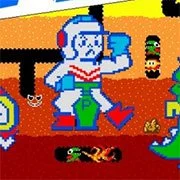
Dig Dug 2 (Arcade)


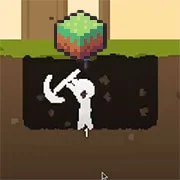


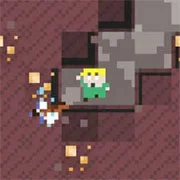


The main difference between Dig Dug and Dig Dug 2 is that the protagonist stays above ground this time around. Taizo Hori still has his air pump, but it is now equipped with two distinctive features. Players can use the dual action air pump to alternate between blowing up enemies with air until they pop, and drill holes and create fault lines. When enough faults and holes are connected and a complete section of the island is severed, it breaks off and falls into the sea.
Dig Dug’s primary weapon serves two purposes; dispatching enemies and exploiting faults. While he can easily eliminate enemies by segregating them on parts of the island that he destroys, Dig Dug faces an increased threat. As the island grows smaller in size, he is left with less room to maneuver
Players earn points whenever a part of an island is broken away. Extra points are also awarded when enemies are destroyed or when Dig Dug finds a bonus icon. Again, the only enemies that you will face are Fygars and Pookas. Fygars are fire breathing dragons that are green in color, while Pookas somewhat resemble tomatoes. The fire from Fygars can instantly kill Dig Dug, but Pookas have no primary attack. Both of these enemies will cause you to lose a life if they make visible contact with your character.
Special Features
Many of the same bonus food icons found in Dig Dug appear in Dig Dug 2. The large drink cup is worth the most, valued at 7,000 points. Other bonus icons include; corn, pineapples, turnips, watermelon, tomatoes, mushrooms, bananas and grapes.
At the beginning of the game, all players have three tries. Extra men are earned when their score reaches 30,000 points. After this, you will get an extra life when your total score is tallied at 80,000 points. Another extra man is awarded to players who earn 100,000 points. Two more chances for extra men come when you have a score of 120,000 and 150,000 points.
Icons
Pookas – This enemy group is considered the least dangerous of the two that appear in Dig Dug 2.
Food bonus icons – Various food icons appear at different stages.
Dig Dug – Also known as Taizo Hori, this is the main character in the game.
Fygars – Fygars are dangerous up close as well as at a distance.
How to Play Dig Dug 2
Players that are familiar with the original Dig Dug may initially be intimated by the new layout presented in this title. However, almost all the same weapons, enemies and movements are used, which will make it much easier for you to adapt. Additionally, the dual action air pump can be used to fend of enemies and connect faults quickly and interchangeably. Use all available space to dodge the Pookas and Fygars, then try to group them in an area that can be destroyed with one or hit ‘hits.’
Level 1
Stage one is rife with faults and holes, which will enable you to dispatch all of your enemies fairly quickly. The shape of the island that appears on this stage is a long rectangle, with most of the faults appearing in the upper right hand corner and the lower left side. The food bonus icon that appears on level one is the turnip.
Level 2
The island on level two is shaped like an abstract butterfly, with a symmetrical pattern of holes toward the middle. This is another level where you can drop almost the entire surface of the island with only a few well placed digs. You will need to outrun at least one Pooka in order to drop all four sides.
Level 3
Many of the holes and faults are grouped in neat rows and columns on random parts of the island. On level three, you should direct Dig Dug to the bottom right corner of the island first. This is where several Pookas are located. You can take care of them one by one with the dual action air pump, or break off this portion of the island.
There may be a couple of enemies remaining at this point. Try to corner them in an area of the island and take them out by drilling into the holes. If done correctly, an eggplant icon will appear.
Level 4
Shaped like a crude capital ‘A,’ Dig Dug has another large area of holes in the middle to work with. You should stay in the middle, drilling quickly whenever monsters begin to approach.
Level 5
This level will be a little harder to complete as a large part of the island is accessible by a single narrow path. There will be lots of opponents on the right side, so be careful not to get trapped. Also keep out a look out behind you as some enemies will attack while you are busy drilling away towards the right. The tomato bonus is standard on this stage.
Level 6
On level six you will find out how easy it is to drill away a substantial portion of the island with only a few faults present. If you stay to the left, you can drop all of your enemies within seconds.
Level 7
Level seven’s island looks like a capital letter ‘N.’ Most of the faults are in the middle again, but they appear closer to the top this time. If you head right, you can drill and drop the lower right part first. This will leave two ‘walkways’ for the remaining enemies. The watermelon bonus, worth 2,000 extra points, will be awarded when you complete this level perfectly.
Level 8
Stage eight contains a rectangle island with lots of holes for you to choose from. Just follow the faults and holes, drilling and dropping enemies at random until the stage is complete. The grape food icon will be made available to you for the first time on this board.
Level 9
This island is shaped like an hourglass. Although you will have lots of holes to drill, it won’t be easy to get in the middle. Use the dual action air pump to blow up all of the monsters that block your path in quick succession. When your enemies no longer pose an immediate threat, go to the middle and drill the area of the island that they are on.
Level 10
There will be two large dips in the island on stage nine. Use the large, single fault in the middle to your advantage. Whenever an enemy approaches, you can drill and drop small sections as necessary. Once at the bottom, go toward the dip and break away a larger chunk. An icon that looks like a bunch of bananas will be awarded, giving you 4,000 bonus points for completing this level.
Level 11
On stage 11, you will battle enemies on an octagon shaped island. There will be many holes set in the shape of a rectangle. Around this group of holes will be several long faults, running left to right and top to bottom. Standing in the middle of the holes, you will be able to easily connect them to the faults running left to right. Intermittently, an enemy or two will approach. Win the banana bonus by dropping several of your enemies on each portion of island destroyed. Successfully complete this level to receive the banana icon bonus worth 4,000 extra points.
Level 12
Shaped like a capital letter ‘M,’ there will be tons of Fygars and Pookas to take care of here. Try to avoid going to the far right or far left bottom corners until you have eliminated almost all of your enemies. The faults and holes on this stage are set in a staggered manner, which will cause you to travel somewhat erratically. The best strategy for defeating stage 12 is to go back and forth between pumping up the monsters that get close enough and drilling faults. At the end of the stage, you should see the corn icon. This bonus is worth 5,000 points.
Level 13
There is a single dip on the lower right hand side. Two small faults run directly above the bottom right corner of this island. Level 13 is another board where Dig Dug will have to make due with the many faults and holes that are scattered around. The corn bonus icon is also award on this level.
Level 14
This island is a large square, with two rectangular cut outs on the top and on the bottom. The pineapple bonus is given to players that drop multiple enemies on this stage, and it is worth a total of 5,000 points. As this island is completely symmetrical, faults and all, it will be easy for you to find an exact pattern that works for you. Drilling either of the two vertical faults in the middle will cause about 1/3 of the island to drop off into the water.
Level 15
To the immediate right, there will be one Fygar and one Pooka approaching you. Ideally, you will want to use the dual action air pump to eliminate them fast. Next, turn your attention toward the left side of the island where there will be a couple of faults that you can take advantage of. When all of the monsters have been destroyed, you will be able to pick up the pineapple bonus.
Level 16
This island looks like a large letter ‘C,’ with most of the faults appearing on the left and on the bottom. If you move to the bottom of the board first, you will be able to clear out all monsters and leave a large section of the top untouched. This is where the large drink icon valued at 7,000 points will appear.
Level 17
Level 17 includes another rectangle shaped island, only it is very narrow. This makes the stage more difficult, but you will also go in knowing exactly how all enemies will approach. Drill the faults directly below you first. A large area to the left should drop off, taking out several opponents with it. The rest of this level can be approached casually as you will have more room to walk around with fewer Fygars and Pookas to battle. A bonus will be awarded on this level, but all icons will be randomized from now on.
Level 18
Level 18 is complicated. There will be so many faults present that you may be confused and end up accidentally dropping the portion of island that you are standing on. To combat this, get rid of the opponents closest to you. This will give you more time to think about your next move. Try to drop all of the areas of the island that are sticking out to the left of the screen first. Repeat this strategy on the far right.
Level 19
This island is shaped like a perfect square. All of the faults will zig zag, going left then down, up then right. A single hole to the very right of the island can be connected to this major ‘roadway’ of faults, making it easier for you to know where to dig next. When enough faults have been connected, you can drop a massive area of the island.
Level 20
The two big dips on the bottom and the top of this board will give you a single, narrow walkway to use. Depending on whether you go left or right, there will be a different number of enemies for you to destroy. It is best to walk to the left first because only one Pooka will be waiting. Use the faults on this side to drop the left side first. After that, you can manually blow up every enemy that comes in your way.
Level 21
To complete this level without wasting any extra men, you will have to first go to the top and inflate the Pooka stationed in the area. Travel back down to the bottom and take care of the Pookas and Fygars pacing back and forth. If you then stand in the right corner of the island, you will be able to connect the fault and drop all remaining enemies.
Level 22
The odd, curve shaped portion of this island on the right will be the toughest area to clear. There will be almost no room for you to maneuver, so ensure that you don’t have any enemies following you when you approach. However, the series of holes toward the bottom should make this task much simpler. Simply pop any enemy that crosses your path and intermittently connect the existing faults to these holes.
Level 23
On level 23, there will be a large block containing many faults that run from left to right. In the middle of these faults you will see a big area in between these faults that is completely unscathed. While you may instinctively want to head for the middle, this part of the island is especially treacherous. Instead, direct Dig Dug down so that he can work from bottom to top.
Level 24
Two big, V-shaped dips at the top of the island on level 24 create three individual paths. Save this area for last. There will be two smaller V-shaped dips at the bottom, but the paths will not nearly be as narrow. Essentially, if you can stay toward the middle, you will be able to drop different parts of the land mass in successive chunks.
Level 25
Stage 25 has many twists and turns. There will be many small paths to get trapped in, so don’t go near then until you are sure that all remaining enemies are far enough away. On the far left side, you will see a Fygar. Take him out first. When you start to drill on the right, go from top to bottom.
Level 26
This island sort of looks like a rocket ship with a large and distinctive dip on the bottom. If you move up first, you will run into two monsters. You can take out these Fygars one at a time with the dual action air pump, which will be easier than trying to drop them. Head back to the middle where all of the faults are. Drill on the faults to get rid of every other enemy.
Level 27
On stage 27 you will again face a complex series of paths and dips. Almost all of the holes on this level are located to the far right. The faults are on the left. If you can connect one of these holes to an adjacent fault, dropping most of the island will be easy work.
Level 28
There are more faults than there are holes on this square shaped island. However, your enemies will come fast and hard, making it very difficult to get much accomplished. You will need to move quickly, use the dual action air pump to blow them up one at a time, and drill faults and holes whenever you get the chance. Also, beware of accidentally losing a life by dropping the area of land you are standing on.
Level 29
The island on level 29 has one major dip on the top, toward the right and three smaller dips on the bottom and the left sides. Within the top left corner, there are two faults that can be connected with two separate digs. Once this is complete, that area will drop into the ocean. Drill on the top right fault line and drop this chunk next. There will be many faults on the upper left side of the remaining land. Go back and forth between drilling and dual action air pumping your enemies away.
Level 30
The left side of this stage will contain the majority of your enemies on the island. There will be a hole close by when you initially start this stage. Use it to connect to the major fault next to it. This board can be completed quickly if you are able to drill away all four corners.
Level 31
Somewhat shaped like a cross, there aren’t any faults on level 31, but this won’t pose an issue. You will need to do lots of drilling in order to drop all of the four major areas, but doing so will eliminate the bulk of your opponents.
Level 32
The layout of level 25’s island is exactly the same as the island that appears on this stage. This should help to give you a slight advantage. The number of Pookas and Fygars is also the same. You can use the same instructions listed on level 25, or you can opt to try something new if you have any extra lives remaining. The completion of this level does not signal the end of the game as Dig Dug 2 repeated until the player runs out of attempts.
Hints and Tips
Dropping chunks of land can be dangerous to Dig Dug. You will not always be able to tell which area will drop in the beginning. Pay attention to adjoining fault lines and you will start to understand where it is safe to drill.
Make sure that you are actually drilling on a hole or a fault line. You will not be able to make any progress by drilling on an empty area of the board.
Some levels have circular and even slanted areas of land. It will be harder to drop these areas, so start drilling further inland to avoid potential complications.
As always, remember to have fun!